This document provides a guide to integrating custom haptic feedback using the Interhaptics Unity SDK. Haptics can be included through premade components or APIs. Here is the list of available methods:
Core SDK
Platform Extensions for partners
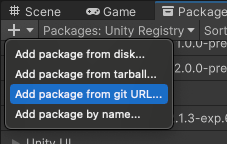
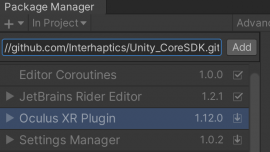
To import the Interhaptics SDK into Unity using the Unity Package Manager, follow these steps:
If the installation is successful, the Interhaptics package will appear in the package list with the git tag.
If you need a previous version you can use the git flags (e.g., https://github.com/Interhaptics/Unity_CoreSDK.git#v1.2.3 – necessary for the PS5 add-on for example). See platform-specific set up in the documentation.
Interhaptics SDK for Unity is compatible with major audio middleware for games (WWise, FMod).
This section assumes that Interhaptics Core Unity SDK is set up. Interhaptics Core Unity SDK functions are not dependent on the target platform and can be implemented only once for all the target devices.
This section covers the fundamentals and how to trigger haptics. If you do not want to write code, we have premade Unity Components.
To start, include for the Interhaptics.Core namespace to use the haptics functions in your script.
using Interhaptics.Core;
Play a constant haptic effect. Useful for notifications and learning haptics.
HAR.PlayConstant(1.0, 0.5); // Plays a constant haptic effect with 100% amplitude for 0.5s.
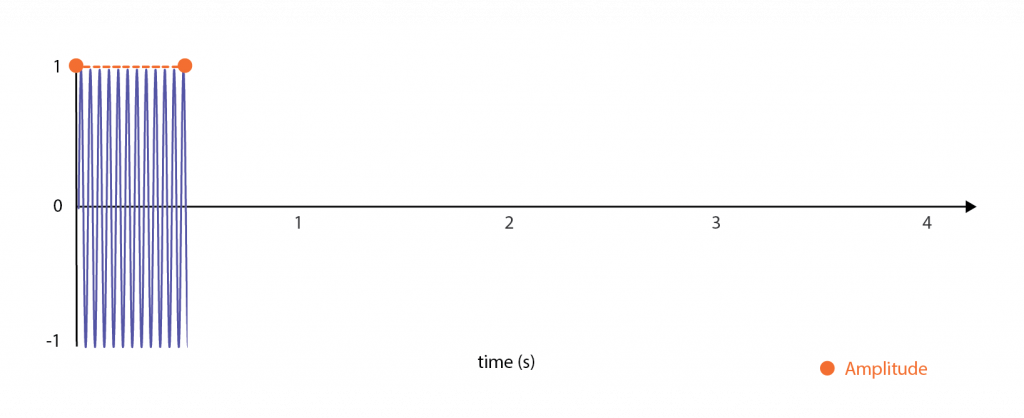
* Amplitude in haptics is like the volume of a sound. It’s all about how strong or powerful the vibration feels. Just like turning up the volume makes music louder, increasing the amplitude makes the haptic feedback (the vibrations you feel) stronger.
Play a haptic shock. Use for clicks or rapid effects like machine guns.
					HAR.PlayTransient(); // Play a transient effect immediately
HAR.PlayTransient(0.5, 1.0, 1.0); // Play a single transient at 0.5 seconds with the highest pitch. See advanced haptics for pitch explanation. Use 1 to get familiar with it.
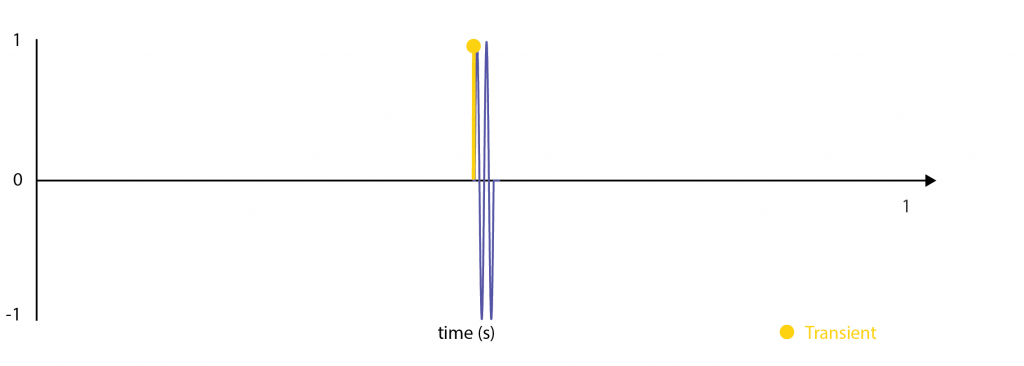
* Transients in haptics are sudden changes or spikes in the vibration pattern. Imagine tapping your finger quickly on a table, or a button click. It’s a brief, distinct vibration that stands out from a more constant, ongoing vibration pattern.
** See Advanced Haptics for pitch explanation. Use 1.0 to start getting familiar with it
Advanced haptic effects are based on parameters coded into array structures. There are two types of array structure:
Amplitude and Pitch* Arrays: Follow a time-value-time-value pattern. Each pair represents a point in time expressed in seconds and its corresponding Amplitude or Pitch expressed between 0 and 1.
Transient Arrays: Use a time-amplitude-pitch-time-amplitude-pitch pattern. Each triplet consists of a time expressed in seconds, an Amplitude value, and a Pitch value. Amplitude and Pitch values are between 0 and 1.
* Pitch is the normalized vibrational frequency between a minimal and maximal frequency. Pitch shapes the feeling of the haptics experience. A low pitch feels rumbly and deep, and a high pitch feels sharp.
HAR.Play(new double[] {0, 1, 1, 0.5, 2, 1}); // plays a vibrations starting at maximum amplitude, decrease at 0.5 at 1 second, and back to 1 at 2 seconds.
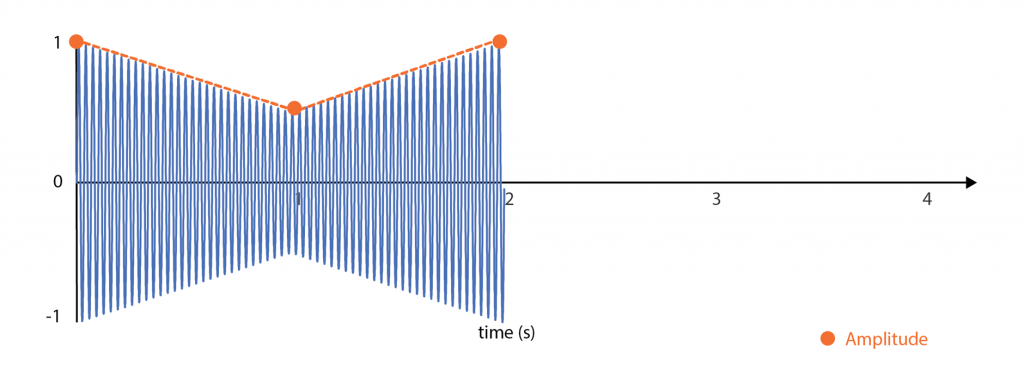
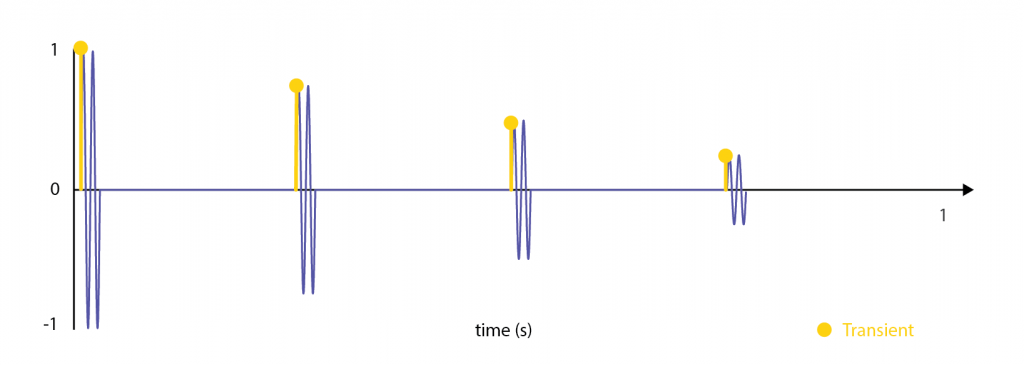
					// A series of transients with decreasing amplitude and constant pitch
double[] transient = {
		0.0, 1.0, 0.5,
		0.25, 0.75, 0.5,
		0.5, 0.5, 0.5,
    	0.75, 0.25, 0.5
	 };
HAR.PlayTransients(transient);
Mix amplitude and transient patterns. Use for example to create an explosion shock with a vibrating tail.
					// Amplitude array as time amplitude pairs
double[] amplitude = {
	0.0, 0.5,
	2.0, 0.5,
};
// Transients expressed as time amplitude pitch triplets
double[] transient = {
	0.5, 1, 0.5,
	1.5, 0.75, 0.5
};

HAR.Play(amplitude, transient, 1.0, 1, LateralFlag.Left); //Plays the complex pattern described by the arrays 2 times at intensity one on the left side. See Intensity Controls
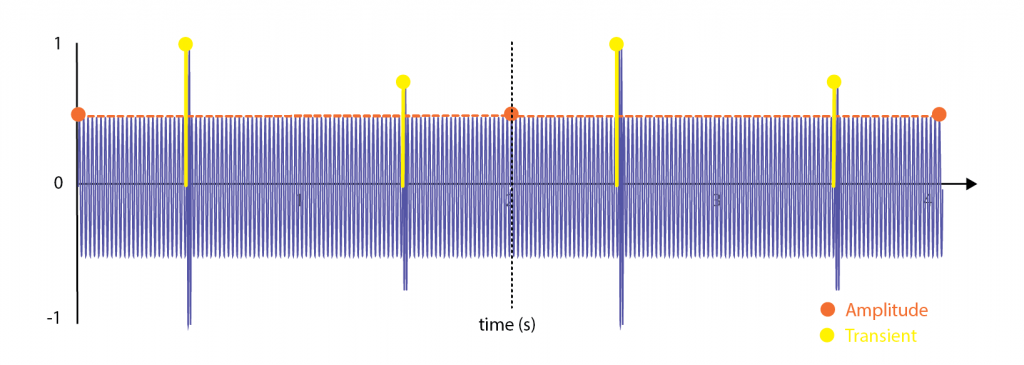
Mix Amplitude and Transient patterns, and modulate the pitch of the effect. Use to change the feeling of haptics from rumbling to sharp and create variance in the effects.
					// Amplitude at 0.5 between 0 and 2 seconds
double[] amplitudes = {
			1.0, 0.5,
    		3.0, 0.5
	};
// pitch between 0 and 1
double[] pitch = {
			1.0, 1.0,
			3.0, 0.0
	};
HAR.PlayAdvanced(amplitudes, pitch); //Plays a constnt haptic effect with increasing pitch, form rumbly to sharp
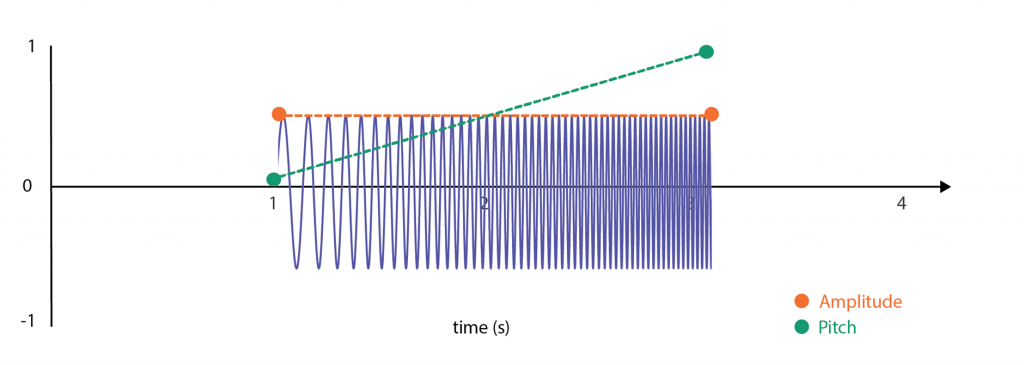
*The default value when non-declared of Frequency Min and Frequency Max are respectively 65 and 300 Hz corresponding to the variable frequency range of iPhones.
Usage 2: Increasing and decreasing amplitude with a longer tail. The pitch is swiped from max to min back to max to create a “bomb dive” effect with two ticks. The frequency range is expanded to take advantage of specific controller haptics capabilities like DualSense.
					// Amplitude array
double[] amplitudes = {
	0.0, 0.0,
	1.0, 1.0,
	2.0, 0.5,
	3.0, 0.25,
	4.0, 0.25
};
// pitch array
double[] pitch = {
	0.0, 1,
	2.0, 0,
	4.0, 1
};
// transient array
double[] transients = {
	0.5, 1, 0.5,
	3.5, 0.5, 0.5
};
double _fmin = 30;
double _fmax = 400;
HAR.PlayAdvanced(amplitudes, pitch, _fmin, _fmax, transients);
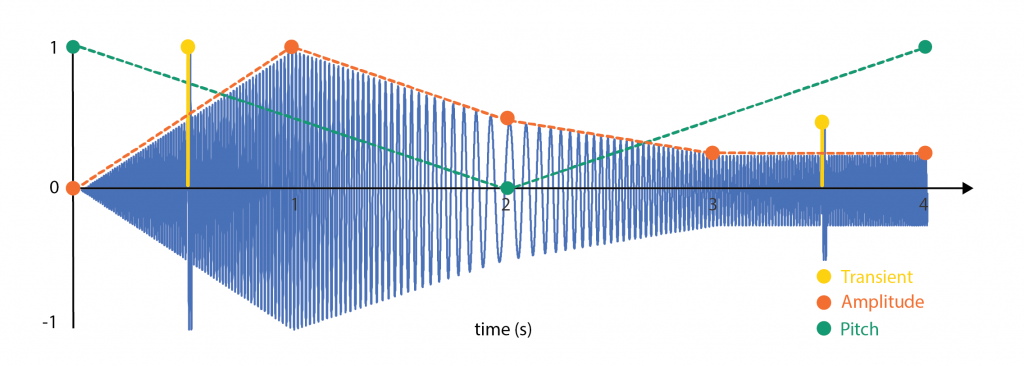
The PlayHapticEffect() method is designed for playing haptic effects defined in a haptic effect asset (haps file). The function allows to specifying the playback details of the haptic feedback included in the haps file, such as its intensity, the side of the controller where the effect should occur, and the number of times the effect should loop.
Haps files have larger expressive capabilities compared to Advanced Haptic Effects as they can mix multiple vibrational patterns and define timelines. Haps flies can be edited with the Haptic Composer
Basic usage:
					using UnityEngine;
using Interhaptics.Core;

public class HapticEffectPlayer : MonoBehaviour
{
    public HapticMaterial myHapticMaterial; // Assign this in the Unity Inspector
    void Start()
    {
        // Play the haptic effect on start
        PlayMyHapticEffect();
    }
    void PlayMyHapticEffect()
    {
        if (myHapticMaterial != null)
        {
            HAR.PlayHapticEffect(myHapticMaterial);
            Debug.Log("Haptic effect played successfully!");
        }
        else
        {
            Debug.LogError("Haptic material is not assigned!");
        }
    }
}
Selection, Light, Medium, Heavy, Rigid, Soft, Success, Failure, Warning) corresponds to a specific set of haptic parameters that define the tactile sensation. These presets are designed to simplify the process of implementing haptic feedback in simple applications. It allows to easily evoke specific tactile experiences such as a light tap (Light), a more intense vibration (Heavy), or a pattern that suggests success.
					using Interhaptics.Utils;

vois Start()
{
    HapticPreset.Play(HapticPreset.PresetType.Success); // Plays a 'Success' haptic pattern
}
The following chapters will detail the process of configuring the main Unity Components.
The SDK includes sample scenes already set up for Controllers, Mobile, and XR. Check our Tutorials section.
Unity components allow full control of the Interhaptics Engine and should be used if the previous methods are insufficient. They include:
Skip this section and go to Haptic Body Part Component.
Do not add the HapticManager component as it has been changed from a Monobehaviour to a static class from this version to include a set of playback features like runtime intensity management and looping.
Begin by creating an empty GameObject in Unity. Add the HapticManager component to this GameObject to manage haptic feedback. The HapticManager can be configured to persist across different scenes if required.
The HapticBodyPart components are vital for assigning and managing haptic feedback to different parts of the controller or targeted haptic device.
PC Controllers (GameInput / XInput), see image below
Mobile Devices (Android / iOS), see image below
OpenXR/Meta Quest VR Controllers, see image below
PS5 DualSense Controllers, see image below
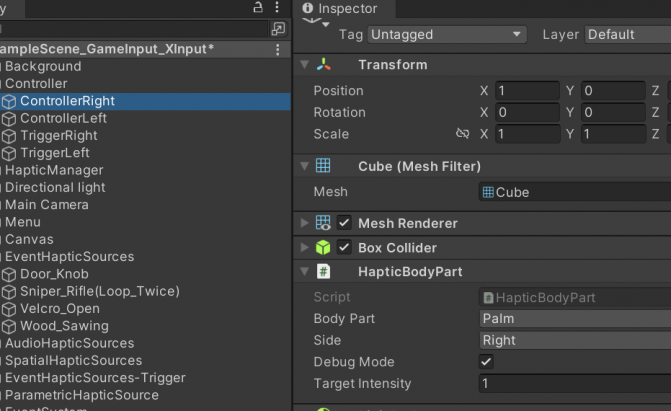
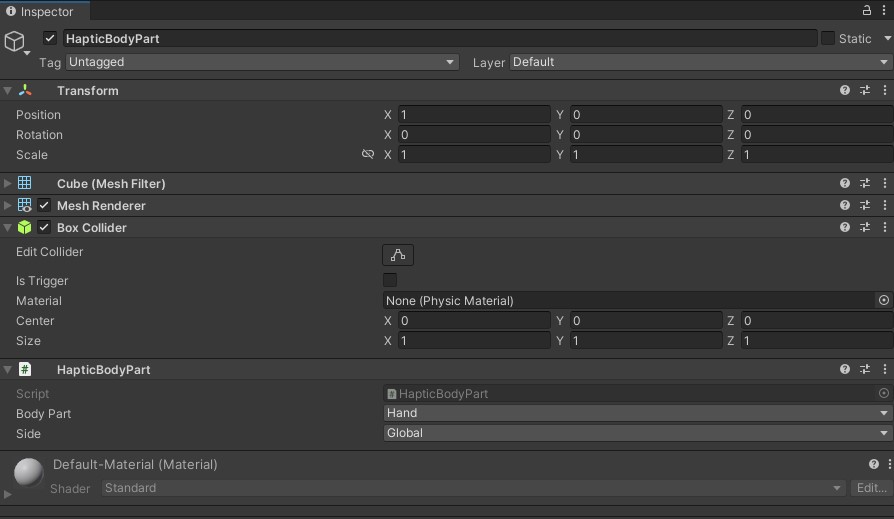
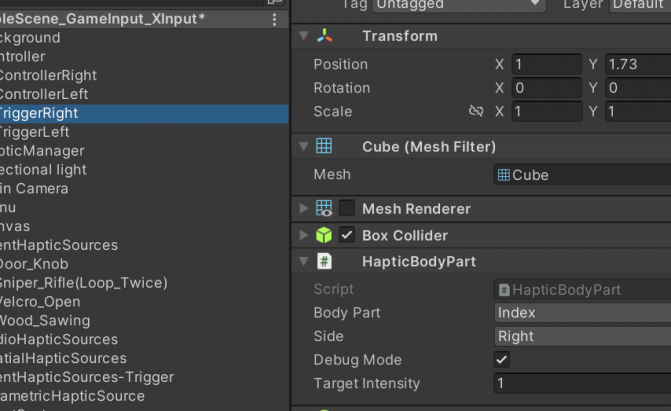
Haptic Sources are the core components within the Interhaptics Unity SDK that generate the sensation of touch or vibration in response to events within the game world. These sources provide a bridge between the virtual interactions and the user’s sense of touch, offering a range of options to create a rich haptic experience.
To create a haptic source:


Each HapticSource component corresponds to a specific type of haptic feedback and is designed for certain interactions within the game:
EventHapticSource is used to play haptic effects triggered by discrete events, such as the feeling of pressing a button.
It is typically connected to events within the Unity Inspector and uses the PlayEventVibration() method to activate the effect.
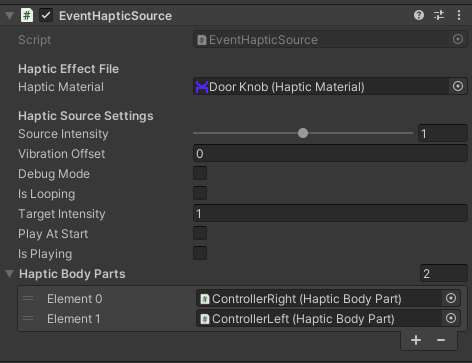
SpatialHapticSource activates haptic feedback in response to spatial events, such as collisions or objects entering a trigger zone.
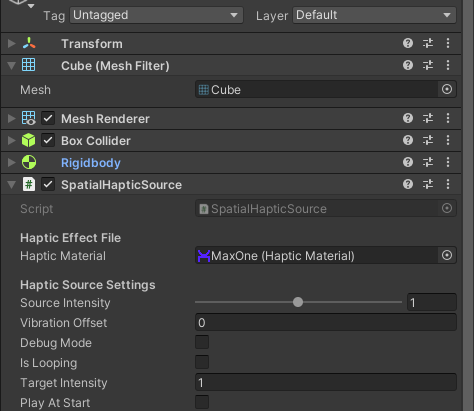
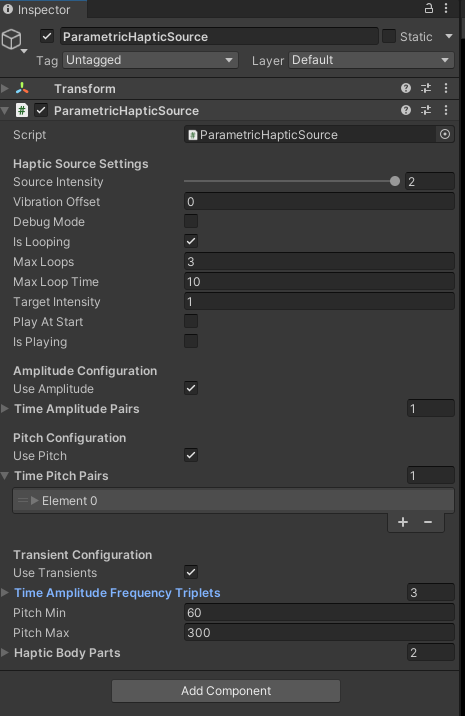
ParametricHapticSurce allows more complex haptic patterns that do not require pre-made haptic effects or advanced programming.
This component can interpret and play haptic effects based on parameters like amplitude and pitch over time for continuous haptics and/or transients.
Define continuous haptic parameters, such as amplitude and pitch over time, to create a range of sensations from subtle to strong.
Adjust transient haptic parameters to simulate sudden impacts or bursts of vibration. This is done by adding triplets of time amplitude pitch in the component.
See the Player Control API methods for examples.
AudioHapticSource helps to synchronize haptic feedback with audio signals It enhances the user’s immersion by linking sound with haptics.
AudioHapticSource also integrates an AudioSource component for direct association with audio clips.
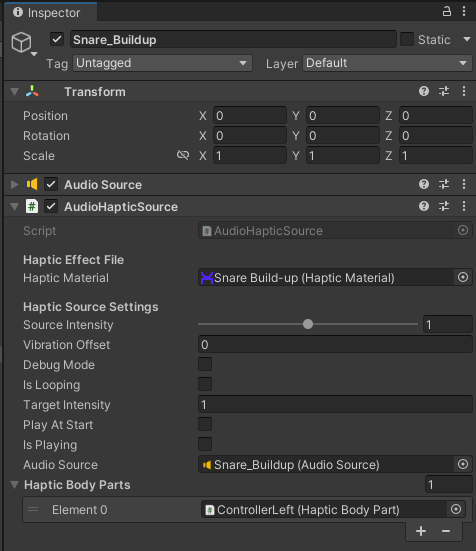
Each HapticSource offers a variety of settings that can be configured to suit the needs of the application:
Select a haptic effect from a library of pre-existing haptic files (.haps) or create custom haptic effects using the Haptic Composer app. (Download | Documentation)
Custom effects can be designed from scratch or by importing and converting audio files into haptic patterns within the Haptic Composer.
Vibration Offset: Delay the start of the haptic effect to align with in-game events.
Source Intensity: Manage the intensity of the haptic feedback, with values adjustable between 0 (no intensity) and 2 (maximum intensity). This setting can be changed in real-time to respond to game dynamics (except on mobile where it is updated at the beginning of a new playback).
Debug Mode: Provides real-time logs in the console for debugging purposes, indicating when haptic feedback starts and stops.
Looping: Determine whether the haptic effect should repeat and set conditions for looping, such as the maximum number of loops or a loop time value. The minimum between the maximum number of loops or the loop time will be taken into account.
Play At Start: Specify if the haptic effect should start immediately when the GameObject containing the Haptic Source becomes active, with special consideration for Spatial Haptic Sources (set as false).
Haptic Body Parts Array: Link the haptic source to specific controller areas defined in the HapticBodyPart settings, such as Palm, Index, or Hand, and determine the target side (left, right, or global) for the effect.
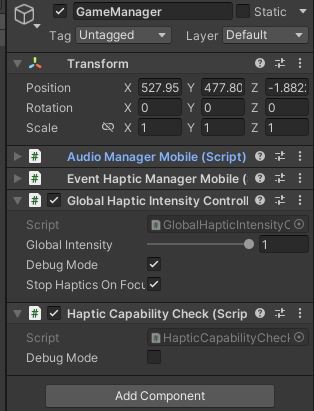
The GlobalHapticIntensityController class/component is used for adjusting the intensity of haptic feedback.
This class completes Source Intensity controlling the intensity of haptic sources, and target intensity controlling the haptic intensity of body parts.
GlobalHapticIntensityController integrated into a GameObject provides a centralized system to manage haptic feedback.
Global Intensity Adjustment: Modify the strength of haptic effects throughout the game.
UI Integration: Allow players to customize the haptic intensity to their preference via UI components.
Debugging Support: Provide logs for identifying and resolving issues with haptic feedback.
Pause/Resume Functionality: Enable control over haptic feedback during game interruptions through the public methods StopAllHaptics() and ResumeAllHaptics()
Suspend or keep the haptic playback if the app is not in focus – check (true by default)
The HAR class in the Interhaptics.Core namespace provides a suite of static methods for controlling and interacting with the Interhaptics Engine.
A complete documentation based on the commented source code can be found here (Doxygen html archive): Interhaptics_Unity_SDK_1.6Doxygen-HTML
Init and Quit appropriately.[DllImport] to link to the native library, either HAR or __Internal for iOS.Amplitude: The intensity of a haptic effect or experience indicated from 0 to 1.
Pitch: The normalized vibrational frequency between a minimal and maximal frequency. Pitch shapes the feeling of the haptic experience. A low pitch feels rumbly and deep, and a high pitch feels sharp. It is indicated from 0 (minimal frequency) and 1 (maximal frequency)
Transient: A short haptic shock similar to a click.
The PlayConstant method in Unity is tailored to play a continuous, steady haptic effect for a specified duration and at a set amplitude. This function is particularly useful for creating a consistent tactile sensation, like simulating a constant vibration or a sustained force.
amplitude: A double specifying the strength of the haptic effect. Ranges typically between 0 (no effect) and 1 (maximum effect).time: A double indicating the duration (in seconds) for which the haptic effect should be played._intensity (optional): A double that sets the overall intensity of the haptic feedback._loops (optional): An int representing how many times the effect should repeat. The default is set to a predefined constant, usually implying no loop or a single play._controllerSide (optional): A LateralFlag value determining on which side of the controller (left, right, or both) the haptic effect should be played.To use the PlayConstant method, simply provide the desired amplitude and duration for the haptic effect. Optionally, you can also specify the intensity, number of loops, and the controller side.
					using Interhaptics.Core;

// Example of using PlayConstant
void PlayConstantExample()
{
    // Define the amplitude and duration
    double amplitude = 0.5; // Medium strength
    double duration = 2.0; // 2 seconds long

    // Optional parameters
    double intensity = 0.8; // Slightly less than full intensity
    int loops = 1; // Play the effect twice (1 loop after the initial play)
    LateralFlag controllerSide = LateralFlag.Left; // Play on the left side of the controller

    // Play the constant haptic effect
    HAR.PlayConstant(amplitude, duration, intensity, loops, controllerSide);
}

void PlayConstantGraphBelow()
{
HAR.PlayConstant(1.0, 0.5); // Plays a constant haptic effect with 100% amplitude for 0.5s.
}

In this example, in the first function a haptic effect with a medium amplitude will be played on the left side of the controller for 2 seconds, at slightly less than full intensity, and will repeat once after the initial play. The second function plays a constant haptic effect with 100% amplitude for 0.5s like in the graph shown and has no optional parameters (set to default).
The PlayConstant method is ideal for scenarios where a uniform haptic sensation is required over a period. It can be used in various contexts, such as simulating the feeling of holding a vibrating object, creating a steady background tactile sensation, or providing continuous feedback in response to a user action. This method offers a straightforward implementation for achieving consistent haptic feedback in Unity applications.
The PlayTransient method in Unity is designed to play a brief, single-instance haptic effect, known as a transient, at a specified moment, with defined strength and pitch characteristics. This function is valuable for creating momentary tactile sensations like a quick tap or jolt.
time: A double that specifies the exact moment (in seconds) when the transient haptic effect should occur. Default value ~ 0.0amplitude: A double representing the strength of the transient effect, ranging from 0 (no effect) to 1 (maximum effect). Default value = 1.0 (values between 0 and 1)pitch: A double indicating the pitch of the transient effect. The term pitch here refers to the speed or rate of the vibration, contributing to how ‘sharp’ or ‘soft’ the transient feels. Default value ~ 1.0 (values between 0 and 1)_intensity (optional): A double that sets the overall intensity of the haptic feedback._loops (optional): An int representing the number of times the transient should repeat._controllerSide (optional): A LateralFlag indicating on which side of the controller the haptic effect should be played.To use the PlayTransient method, you need to define when the transient should occur, its amplitude, and its pitch.
					// Examples of using PlayTransient

// Set the time, amplitude, and pitch for the transient
double time = 0.5; // Half a second after being called
double amplitude = 1.0; // strong transient
double pitch = 1.0; // High pitch

// Optional parameters
double intensity = 1.0; // Full intensity
int loops = 0; // No looping
LateralFlag controllerSide = LateralFlag.Global; // Play on both sides

// Play the transient haptic effect
HAR.PlayTransient(time, amplitude, pitch, intensity, loops, controllerSide);
//HAR.PlayTransient(time, amplitude, pitch); same effect with default parameters
//HAR.PlayTransient(); // Plays a transient immediately with the default values 1.0 and 1.0 for amplitude and pitch

In this example, a strong, high-pitched transient haptic effect is played on both sides of the controller half a second after the method is called.
The PlayTransient method is highly suitable for scenarios where a quick and distinct haptic feedback is necessary. This could be in response to a user action, an event in a game or application, or as a part of a complex haptic sequence. It’s particularly useful for simulating brief interactions like clicks, taps, or short vibrations.
The PlayTransients method in Unity is designed to play a sequence of transient haptic effects, each defined by a specific moment in time, its strength, and pitch. This function is ideal for creating a series of short, distinct tactile sensations that can simulate various interactions like a series of taps or vibrations.
transients: An array of double values forming triplets that define each transient effect. Each triplet consists of Time (when the effect occurs), Amplitude (strength of the effect), and Pitch (rate or ‘sharpness’ of the vibration)._intensity (optional): A double value that sets the overall intensity of the transient effects._loops (optional): An integer specifying how many times the sequence of transients should repeat._controllerSide (optional): A LateralFlag indicating on which side of the controller the haptic effect should be played.To use PlayTransients, you need to define an array of transient triplets, each specifying the timing, amplitude, and pitch of the transient effect.
					// Transients expressed as time amplitude pitch triplets
double[] transient = {
		0.0, 1.0, 0.5,
		0.25, 0.75, 0.5,
		0.5, 0.5, 0.5,
    	0.75, 0.25, 0.5
	 };
HAR.PlayTransients(transient);

PlayTransients is particularly useful in applications where a sequence of momentary haptic feedback is required. This could be in response to a series of user actions, as part of a notification system, or to simulate a texture or pattern in a virtual environment. It provides a versatile way to create rich and varied haptic experiences through a sequence of brief tactile events.
The Play method in Unity offers two variations to create customized haptic experiences, employing either amplitude-time pairs or a combination of amplitudes and transient triplets.
amplitudes: An array of time-amplitude pairs, where each pair indicates when (time) and how strong (amplitude) the haptic effect should be._intensity (optional): The overall intensity of the haptic effects._loops (optional): The number of times the effect should loop._controllerSide (optional): The side of the controller where the haptic effect is played.
					// Define an array of time-amplitude pairs
HAR.Play(new double[] {0, 1, 1, 0.5, 2, 1}); // plays a vibrations starting at maximum amplitude, decrease at 0.5 at 1 second, and back to 1 at 2 seconds

This variation is ideal for creating rhythmic or patterned tactile sensations, where the timing and strength of each haptic pulse are crucial.
amplitudes: An array of amplitude values (strength of the effect), ranging from 0 (no effect) to 1 (maximum effect).transients: An array of transient triplets, each formatted as Time – Amplitude – Pitch. Time values are expressed in seconds, Pitch and Amplitude values are between 0 and 1._intensity, _loops, _controllerSide) are similar to Variation 1.
					// Amplitude array as time amplitude pairs
double[] amplitude = {
	0.0, 0.5,
	2.0, 0.5
};
// Transients expressed as time amplitude pitch triplets
double[] transient = {
	0.5, 1, 0.5,
	1.5, 0.75, 0.5
};
HAR.Play(amplitude, transient, 1.0, 1, LateralFlag.Left); //Plays the complex pattern described by the arrays 2 times at intensity one on the left side. See Intensity Controls

This variation allows for playing haptic effects that combine steady amplitudes with transient effects, providing a rich and varied tactile experience.
Both variations of the Play method enable the creation of diverse haptic feedback. Whether simulating environmental effects, mimicking physical interactions, or enhancing user interfaces, these methods provide the flexibility to craft the exact tactile experience needed for your Unity project. By adjusting amplitude-time pairs or mixing amplitudes with transients, you can tailor the haptic feedback to the specific requirements of your interactive scenarios.
PlayAdvanced is a versatile Unity method designed for playing parametric haptic effects. This method enables the creation of complex haptic patterns using specified parameters for amplitude, pitch, and transient effects, offering a high degree of customization for tactile feedback.
_amplitude: An array of amplitude values formatted as Time-Value pairs. Each pair defines the strength of the haptic effect at a specific moment._pitch: An array of pitch values also formatted as Time-Value pairs. These define the ‘sharpness’ or ‘buzziness’ of the haptic effect over time._freqMin (optional): The minimum frequency (or lowest pitch) that the haptic effect can reach._freqMax (optional): The maximum frequency (or highest pitch) achievable in the haptic effect._transient: (optional) An array of transient values formatted as Time-Amplitude-Pitch triplets. Transients add momentary spikes or bursts to the haptic pattern._intensity (optional): Overall intensity of the haptic effect._loops (optional): Number of times the haptic pattern should loop._controllerSide (optional): Side of the controller where the haptic effect should occur.PlayAdvanced is used when you need a nuanced and dynamic haptic pattern. By providing arrays for amplitude, pitch, and optionally transient effects, you can tailor a highly specific haptic experience.
					// Amplitude at 0.5 between 0 and 2 seconds
double[] amplitudes = {
			1.0, 0.5,
    		3.0, 0.5
	};
// pitch between 0 and 1
double[] pitch = {
			1.0, 1.0,
			3.0, 0.0
	};
HAR.PlayAdvanced(amplitudes, pitch);

					// Amplitude array
double[] amplitudes = {
	0.0, 0.0,
	1.0, 1.0,
	2.0, 0.5,
	3.0, 0.25,
	4.0, 0.25
};
// pitch array
double[] pitch = {
	0.0, 1,
	2.0, 0,
	4.0, 1
};
// transient array
double[] transients = {
	0.5, 1, 0.5,
	3.5, 0.5, 0.5
};
double _fmin = 30;
double _fmax = 400;
HAR.PlayAdvanced(amplitudes, pitch, _fmin, _fmax, transients);

Example: Increasing and decreasing amplitude with a longer tail. The pitch is swiped from max to min back to max to create a “bomb dive” effect. The frequency range is expanded to take advantage of specific controller haptics capabilities like DualSense.
PlayAdvanced is particularly beneficial in scenarios where detailed haptic feedback is essential.The ability to control the amplitude, pitch, and transient aspects allows developers to craft a haptic experience that closely matches the intended virtual interaction.
The PlayHapticEffect method in Unity is designed to play haptic feedback using a .haps file.
material: The HapticMaterial object which contains the haptic effect’s data. This is the haptic effect that will be played.intensity (optional): A double value representing the intensity of the haptic effect. It defines how strong the haptic feedback will be.loops (optional): An int that specifies the number of times the haptic effect should repeat. A value of 0 means it plays once without looping, while any positive value sets the number of repeats.controllerSide (optional): A HapticBodyMapping.LateralFlag enum value that indicates the side of the controller where the haptic effect should occur (e.g., Left, Right, or Global).
					using UnityEngine;
using Interhaptics.Core;

public class HapticEffectPlayer : MonoBehaviour
{
    public HapticMaterial myHapticMaterial; // Assign this in the Unity Inspector
    void Start()
    {
        // Play the haptic effect on start
        PlayMyHapticEffect();
    }
    void PlayMyHapticEffect()
    {
        if (myHapticMaterial != null)
        {
            HAR.PlayHapticEffect(myHapticMaterial);
            Debug.Log(“Haptic effect played successfully!”);
        }
        else
        {
            Debug.LogError(“Haptic material is not assigned!”);
        }
    }
}
The StopCurrentHapticEffect method in Unity is designed to immediately cease any ongoing haptic feedback. This function is crucial for ensuring that haptic effects do not overstay their welcome and are synchronized with relevant game or application events.
This method is used to stop all haptic activity currently being executed, especially in mobile applications (Android or iOS). It’s a straightforward call without parameters.
					// To stop the haptic effect at any point
HAR.StopCurrentHapticEffect();
HapticPreset.Play is a method within the Unity environment that allows for playing predefined haptic effects inspired by Apple’s Human Interface Guidelines. This functionality is part of the HapticPreset class in the Interhaptics.Utils namespace, designed to provide a range of haptic patterns that represent various tactile sensations.
Be sure to include the Interhaptics.Utils namespace (using Interhaptics.Utils;)
presetType: An enumeration (PresetType) defining the type of haptic preset to be played. PresetType is based on Apple’s Human Interface guidelines. Each of these presets (Selection, Light, Medium, Heavy, Rigid, Soft, Success, Failure, Warning) corresponds to a specific set of haptic parameters that define the tactile sensation. These presets are designed to simplify the process of implementing haptic feedback in your application, allowing you to easily evoke specific tactile experiences such as a light tap (Light), a more intense vibration (Heavy), or a pattern that suggests success.To use HapticPreset.Play, simply pass the desired PresetType enumeration value. The method then retrieves the corresponding haptic pattern and initiates the haptic effect.
					using Interhaptics.Utils;

vois Start()
{
    HapticPreset.Play(HapticPreset.PresetType.Success); // Plays a 'Success' haptic pattern
}
_hMaterialId: int – ID of the haptic source._isLooping: bool – True if the source should loop.
HAR.SetEventLoop(1, true); // Enable looping for the source with ID 1
_id: int – The identifier for the haptic effect.double – Length of the vibration.
					//Get the vibration length in seconds for the haptic effect with id 1
double vibrationLength = HAR.GetVibrationLength(1);
_hMaterialId: int – ID of the haptic source to play._vibrationOffset: double – Vibration offset._textureOffset: double – Texture offset._stiffnessOffset: double – Stiffness offset.
					// Play the haptic event with id 1 with specified offset: 0.2 seconds delay
HAR.PlayEvent(1, 0.2, 0.0, 0.0);
_hMaterialId: int – ID of the haptic source to stop.
HAR.StopEvent(1); // Stop the haptic event with ID 1
HAR.ClearActiveEvents(); // Clear all active haptic events from memory
HAR.ClearInactiveEvents(); // Clear all inactive haptic events from memory
HAR.ClearEvent(hMaterialId);
_hMaterialId: int – ID of the haptic source._vibrationOffset: double – Vibration offset._textureOffset: double – Texture offset._stiffnessOffset: double – Stiffness offset.
HAR.SetEventOffsets(1, 0.2, 0.3, 0.1); // Set offsets for the haptic event with ID 1
_curTime: double – Current time in seconds.
HAR.ComputeAllEvents(Time.time); // Compute all events based on the current time
_hMaterialId: int – ID of the haptic source._target: CommandData[] – Array of CommandData for the target._size: int – Size of the target array._hMaterialId: int – ID of the haptic effect._target: List<CommandData> – List of CommandData representing the target.
					//Add targets to the haptic effect with id 1
List<CommandData> targets = new List<CommandData> { /* ... */ };
HAR.AddTargetToEvent(1, targets);
_hMaterialId: int – ID of the haptic source._target: CommandData[] – Array of CommandData for the target._size: int – Size of the target array._hMaterialId: int – ID of the haptic effect._target: List<CommandData> – List of CommandData representing the target.
HAR.RemoveTargetFromEvent(1, targets);
_hMaterialId: int – ID of the haptic source.
HAR.RemoveAllTargetsFromEvent(1); // Remove all targets from the haptic event with ID 1
_material: UnityEngine.TextAsset or HapticMaterial – The haptic effect to add.int – ID of the haptic effect or -1 if loading failed.
					var textAsset = /* ... */; // UnityEngine.TextAsset
int hapticEffectId = HAR.AddHM(textAsset);
Adds a Haptic Material to the system directly from a HAPS compliant JSON string. Useful for loading from a file from StreamingAssets or Resources.
					string hapsJsonContent;
// Initialize the string with the haps compliant content (i.e. read a file from Resources or StreamingAssets.)
int hapticEffectId = HAR.AddHMString(jsonContent);
double[] _amplitude: Array of vibrational amplitudes to be rendered at a specified time. Each amplitude must be expressed between 0 (no vibration) to 1 (maximal vibration) paired with its associated time expressed in seconds. The vibration amplitude is interpolated linearly between two amplitude values at the respective time.int _amplitudeSize: The size of the amplitude array.double[] _pitch: Array of pitch value to be rendered at a specified time. Pitch is a normalized value of the vibrational frequency between 0 (_freqMin) to 1 (_freqMax). Each pitch must be expressed between 0 and 1 paired with its associated time expressed in seconds.int _pitchSize: The size of the pitch array.double _freqMin: The minimal value of the frequency expressed in Hz of the vibrotactile output for pitch.double _freqMax: The maximal value of the frequency expressed in Hz of the vibrotactile output for pitch.double[] _transient: An array of transient effects to be rendered at a specific time. Each value must be expressed as time amplitude pitch triples. Amplitude and pitch values must be between 0 and 1. Time is expressed in seconds.int _transientSize: The size of the transient array.bool _isLooping: Indicates whether the effect should loop.int: ID of the created haptic source. Returns -1 if creation fails.
					// Amplitude array
double[] amplitude = { };

// Pitch array
double[] pitch = { };

// Transient array
double[] transient = {};

int hapticSourceId = HAR.AddParametricEffect(
    amplitude, amplitude.Length, // Amplitude array with its size
    pitch, pitch.Length,         // Pitch array with its size
    _freqMin, _freqMax,          // Min and Max frequency range
    transient, transient.Length, // Transient array with its size
    false                        // Non-looping for this example
);

if (hapticSourceId != -1)
{
    // Haptic source created successfully
    // Add here logic to assign body part and trigger haptics
}
bool – Always true, indicating initialization completion.
					if (HAR.Init())
{
    // Initialization successful
}
					// Call this method before exiting the application
HAR.Quit();
_id: int – ID of the haptic effect to update._material: UnityEngine.TextAsset or HapticMaterial – The new haptic effect.bool – True if the effect was updated successfully.
					var newMaterial = /* ... */; // HapticEffect
bool updated = HAR.UpdateHM(1, newMaterial);
_intensity: double – Positive value, 0 means no intensity, base value is 1.
HAR.SetGlobalIntensity(0.5); // Set intensity to a moderate level
double – The global intensity or -1 if the mixer is not initialized.
					double intensity = HAR.GetGlobalIntensity();
if (intensity != -1)
{
    // Process the retrieved intensity
}
_hMaterialId: int – ID of the haptic source._intensity: double – Intensity factor value.
HAR.SetEventIntensity(1, 0.75); // Set intensity for the source with ID 1
_hMaterialId: int – ID of the haptic source._target: CommandData[] – Array representing the haptic target._size: int – Size of the target array._intensity: double – New intensity factor.
					// Sets the Target Intensity for haptic effect with id 1
CommandData[] targetData = new CommandData[] { /* ... */ };
HAR.SetTargetIntensityMarshal(1, targetData, targetData.Length, 0.8);
_hMaterialId: int – ID of the haptic effect._target: List<CommandData> – List of CommandData representing the target._intensity: double – Intensity factor value.
HAR.SetTargetIntensity(1, targets, 0.75);
Enhance your Unity projects with high-definition haptic feedback using the Razer Sensa HD Haptics, supported by Interhaptics Unity Core SDK version 1.5.0 and above.

SDK Support: Verify that your project is using Interhaptics Core SDK version 1.5.0 or above to have automatically enabled Razer Sensa HD Haptics support. The Interhaptics Core SDK can be installed via the Unity Package Manager as described in the Getting Started with the Unity SDK chapter.
Compatible Devices: Razer Sensa HD Haptics is compatible with a variety of devices included in the Razer Sensa HD Haptics dev kit.
Driver Requirements: Make sure you have the latest version of the Razer Synapse 4 and Chroma apps for necessary drivers.
Guide: Refer to the standard documentation in the Interhaptics Unity SDK for guidance on adding haptic effects. (Code documentation / No-Code documentation)
Follow these steps to configure a sample Unity scene using Razer Sensa HD Haptics. In this scene, we will create a sequence of haptic events which will simulate two missing pistol shots targeting the player which will be rendered on a head haptic device on the right side first, left side second, followed by a pistol shot coming from the player’s gun.
HapticBodyPart component to each of the four GameObjects created in Step 1.HapticBodyPart, define the appropriate body part and side (Head and Hand).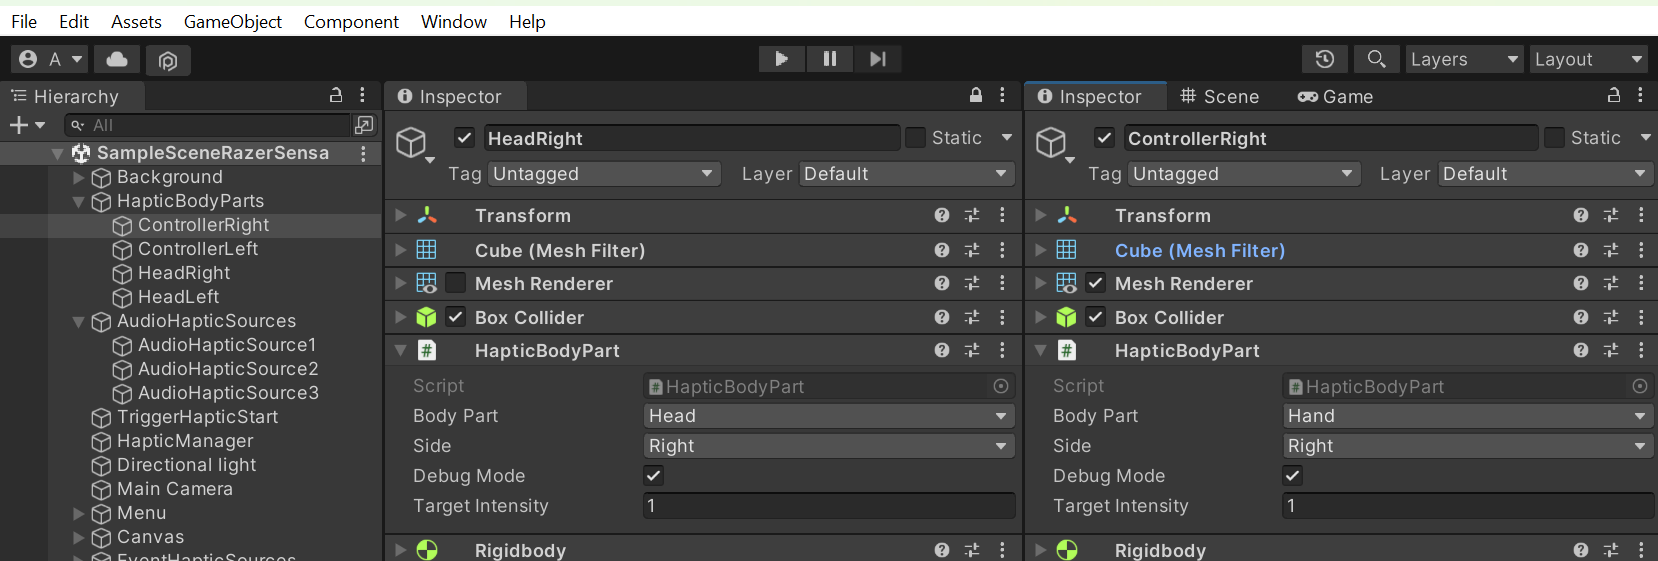
AudioHapticSource component to each emitter GameObject.AudioHapticSource component of each GameObject, assign the respective .haps files from the haptic effects library inside the Core SDK located in the folder Assets\HapticMaterials: BulletCrack.haps for the two haptic sources targetting the head, and PistolShot.haps for the haptic source targetting the controller.AudioHapticSource component, link the corresponding HapticBodyPart GameObjects to ensure the haptic feedback is emitted correctly.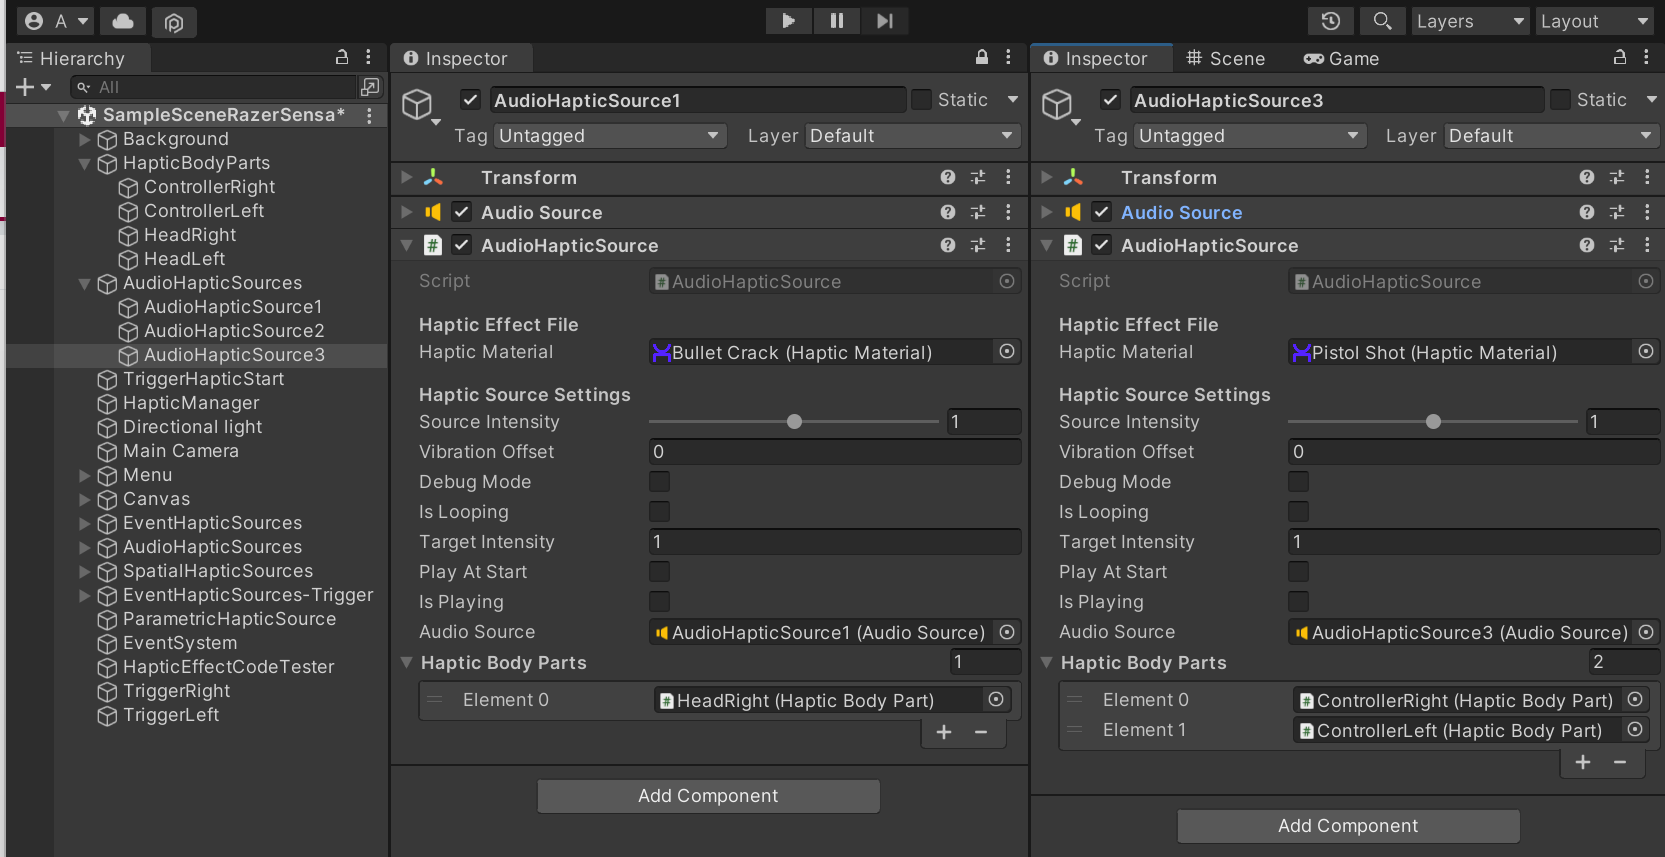
					using System.Collections;
using Interhaptics.Utils;
using UnityEngine;

public class HapticEventTrigger : MonoBehaviour
{
	public AudioHapticSource AudioHapticSource1;
	public AudioHapticSource AudioHapticSource2;
	public AudioHapticSource AudioHapticSource3;

	// Start is called before the first frame update
	void Start()
	{
		StartCoroutine(PlayHapticEvents());
	}

	private IEnumerator PlayHapticEvents()
	{
		// Wait for 0.5 seconds and play the first haptic event
		yield return new WaitForSeconds(0.5f);
		AudioHapticSource1.PlayEventVibration();

		// Wait for an additional 1 second (1.5 seconds in total) and play the second haptic event
		yield return new WaitForSeconds(1.0f);
		AudioHapticSource2.PlayEventVibration();

		// Wait for an additional 1 second (2.5 seconds in total) and play the third haptic event
		yield return new WaitForSeconds(1.0f);
		AudioHapticSource3.PlayEventVibration();
	}
}
2. Attach this script to a GameObject in your scene. Drag and drop the AudioHapticSource components from your GameObjects into the AudioHapticSource1, AudioHapticSource2, and AudioHapticSource3 fields in the Inspector window for this script.
3. When you start the scene, the script will automatically initiate the coroutine, which will sequentially play the haptic events at the specified times.

This documentation concerns setting up the Interhaptics SDK for mobile development (Android/iOS) starting with version 1.1.0 (03.2023) which was overhauled to be aligned with the main SDK. For the older version renamed as legacy, please refer to the Interhaptics Mobile SDK (legacy) page.
The Interhaptics Core SDK can be installed via the Unity Package Manager as described in the Getting Started with the Unity SDK chapter.
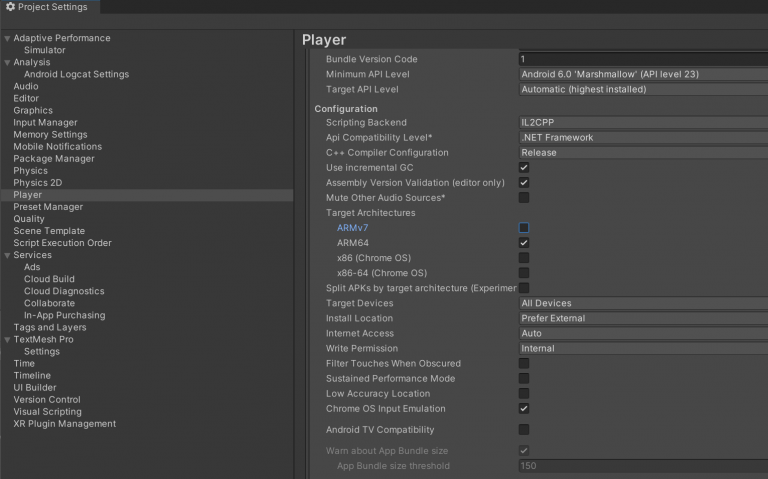
Android: To set up correctly the project, verify that Project Settings -> Player -> Other Settings -> Scripting Backend is set to IL2CPP and set the Target Architecture as ARM64 if it is not checked. Uncheck ARMv7 if it is active (strongly recommended). For Android, set the Minimum API Level 23 (Android 6.0 Marshmallow).
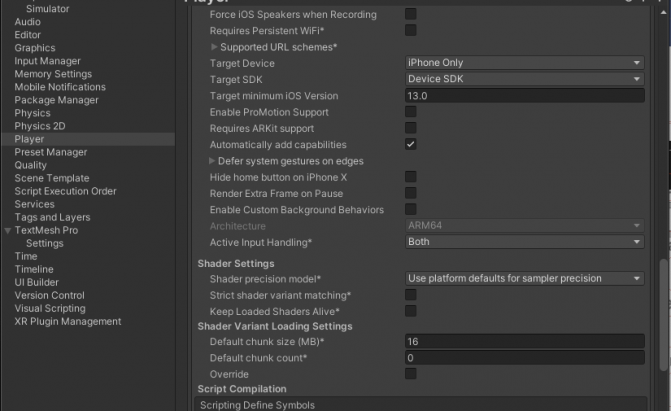
Note: For Android phones that lack native amplitude control support, developers can use the GenericAndroidHapticAbstraction.AmplitudeThreshold parameter to adjust the intensity of haptic feedback. This parameter is an integer value that determines the strength of haptic feedback. It ranges from 0 to 255, inclusively, with 0 representing the minimum amplitude and 255 representing the maximum amplitude. Any value above the specified threshold will trigger vibration on the phone. When modified at runtime, the new threshold will only activate when playing a new haptic effect to the phone. If a haptic effect is currently playing, changing the amplitude threshold will have no immediate impact. Only when a new clip is transmitted, the updated threshold will be utilized.
					        // Can be modified to tune the experience
        // Can be changed in runtime
        public static int AmplitudeThreshold = 100;
Note: When working with iPhones, please be aware that the Unity project is responsible for generating the XCode project, which ultimately builds the app. It is strongly recommended to use the Unity macOS version (and not an Windows version) to build the XCode project.
Some DllNotFoundException: HAR assembly errors might appear in the Unity Editor console. These will not impact the building of the XCode project and should be ignored.
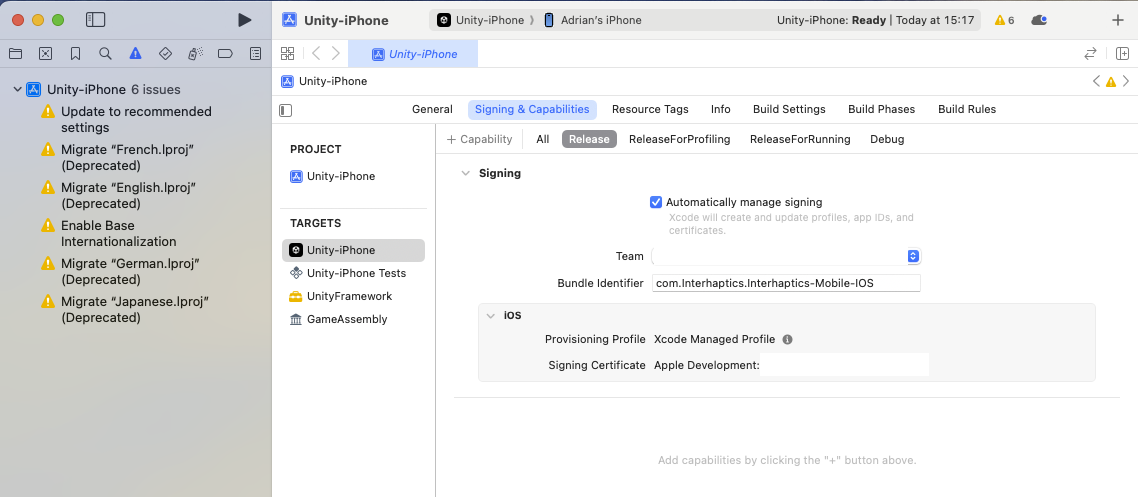
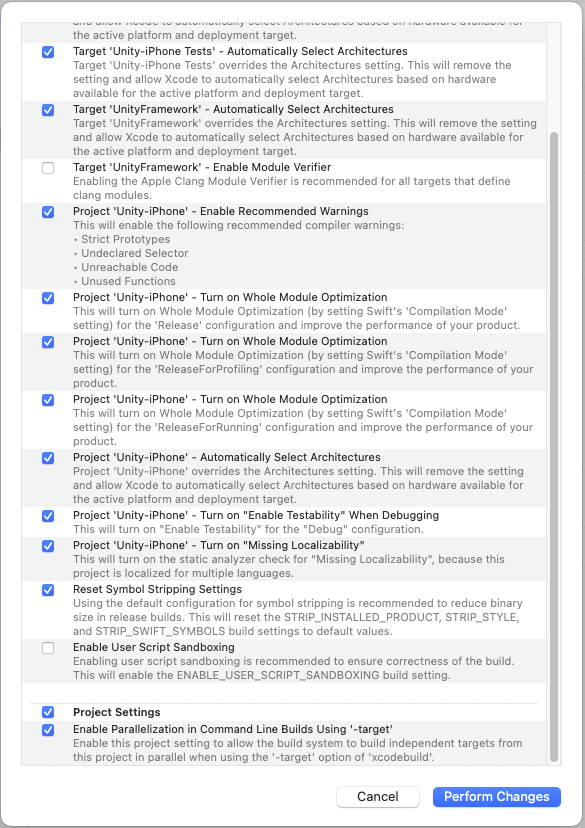
As of our testing, Interhaptics is confirmed to be compatible with XCode versions 14.3 and 15.0+. After you have signed in with your developer team, we recommend disabling the following settings for optimal performance:
These settings are not required for Interhaptics functionality and can potentially introduce compatibility issues. By unchecking them, you ensure a smoother experience when building and running your app on iOS devices.
The maximum length for a haptic effect on iOS is 30 seconds. For anything longer, two or more haptic effects must be chained.
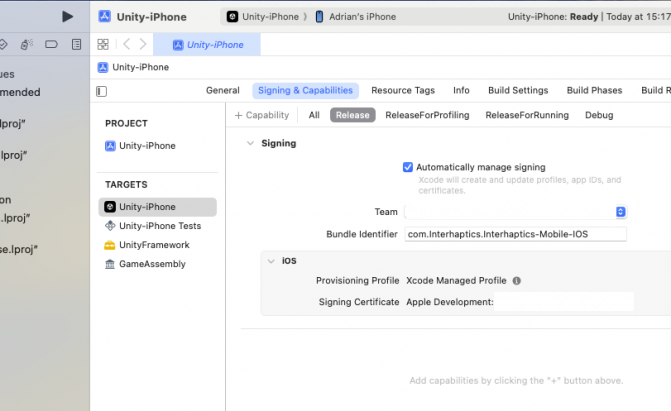
The following steps are for a very quick possible implementation which is explained more in detail in the Getting Started with Unity SDK chapter from this section.
Interhaptics Unity SDK 1.1.0 – 1.2.3
Create an empty GameObject with the HapticManager component, which can be set to be persistent if desired.
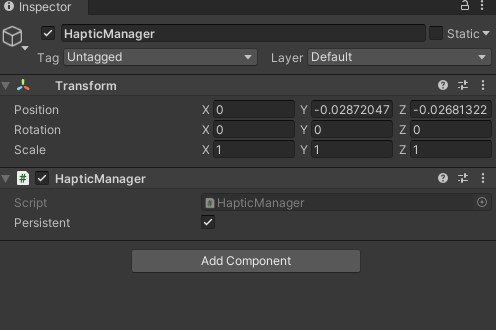
Interhaptics Unity SDK 1.3.0 +
Do not add the HapticManager component, as HapticManager.cs is not a MonoBehaviour class from this version on.
Create another GameObject with a HapticBodyPart component. Set the HapticBodyPart to Hand and Side to Global.

Create an empty GameObject with an EventHapticSource component and choose a haptic effect from the Haptic Effects folder.
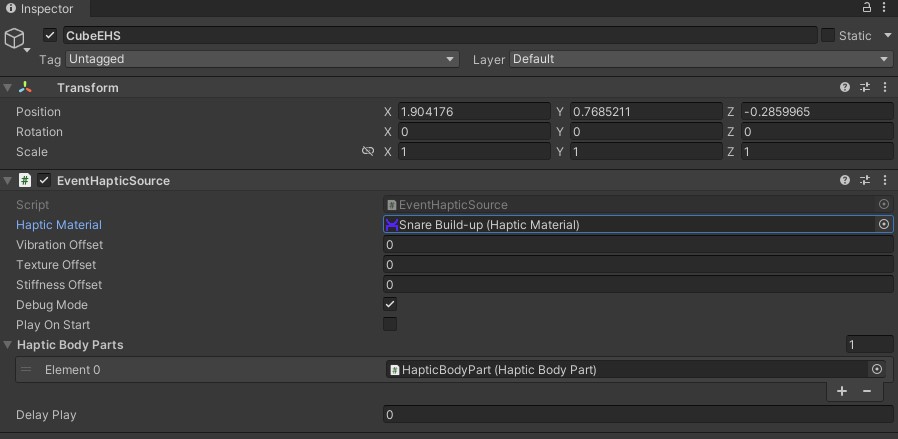
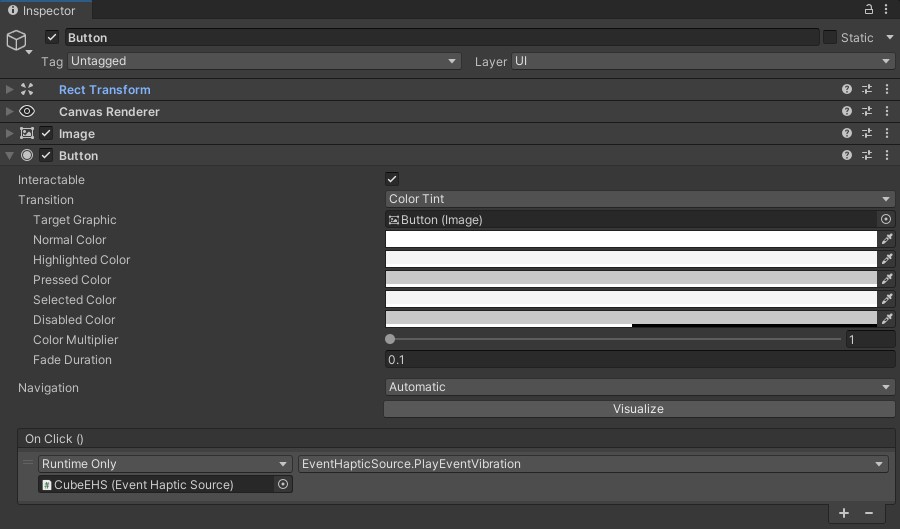
Create a UI element to act as a trigger for haptic feedback. Add OnClick the EventHapticSource GameObject with the PlayEventVibration method.
In this section we will show step by step how to add haptic effects to play on a Unity game using an GameInput / XInput controller. An example scene and scripts are already provided in the Core SDK and can be found in the Interhaptics Core SDK/Assets/Scenes/SampleScene_GameInput_XInput.unity path.
The Interhaptics Core SDK can be installed via the Unity Package Manager as described in the documentation.
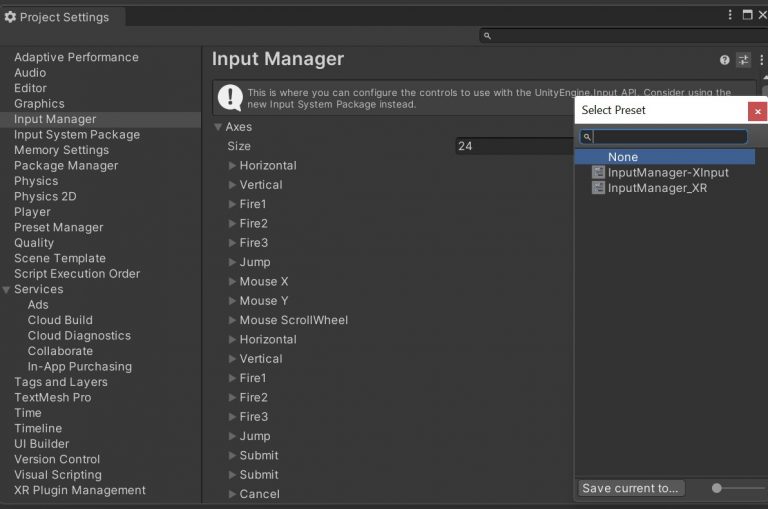
The GameInput/XInput controller can be setup up by setting it up through Unity Input Manager or through the new Input System package. If using the Input Manager, a preset file called InputManager-GameInput_XInput.preset can be found in the in the Interhaptics Core SDK\Assets\InputManager folder. Just click on it and the settings will be applied for the A,B,X,Y and DPad buttons.
Interhaptics Unity SDK 1.1.0 – 1.2.3
Create an empty GameObject with the HapticManager component, which can be set to be persistent if desired.

Interhaptics Unity SDK 1.3.0 +
Do not add the HapticManager component, as HapticManager.cs is not a MonoBehaviour class from this version on.
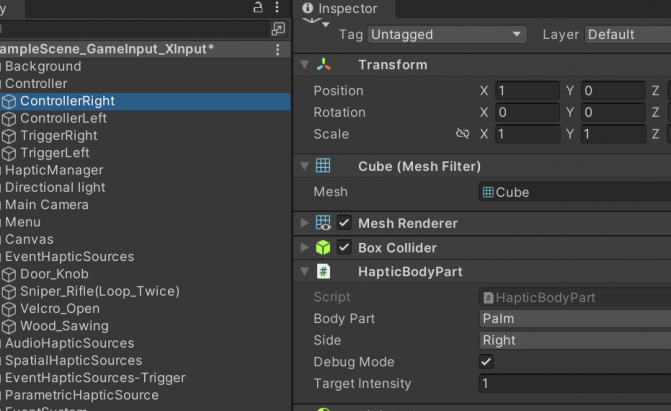
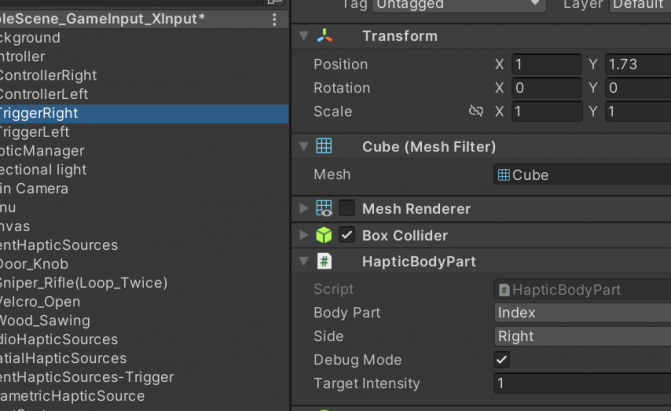
Add HapticBodyPart components for the controller. Set the Body Part to Hand and the Side orientation to Left or Right if you want to separate the haptic motors or Global if you want to send haptic effects in an unified manner. If you want to use Spatial Haptic Sources have a Box Collider and a Rigidbody on the controller (Use Gravity set as false). This HapticBodyPart can be attached to the Player rig if needed and interact with different Spatial and Event Haptic Sources encountered in your game.
For each HapticBodyPart, there is a Debug Mode switch and a Target Intensity value which can be modified at runtime as well. It is working on Spatial Haptic Sources and the intensity is updated before each playback on mobile, or even during runtime on controllers (GameInput/XInput on PC, OpenXR or Meta Quest, consoles).
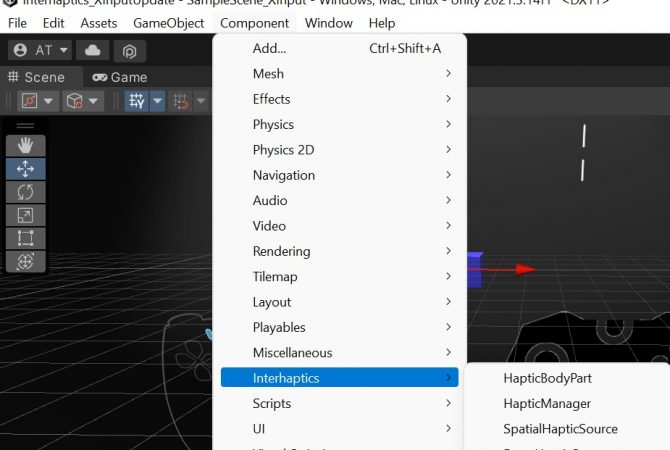
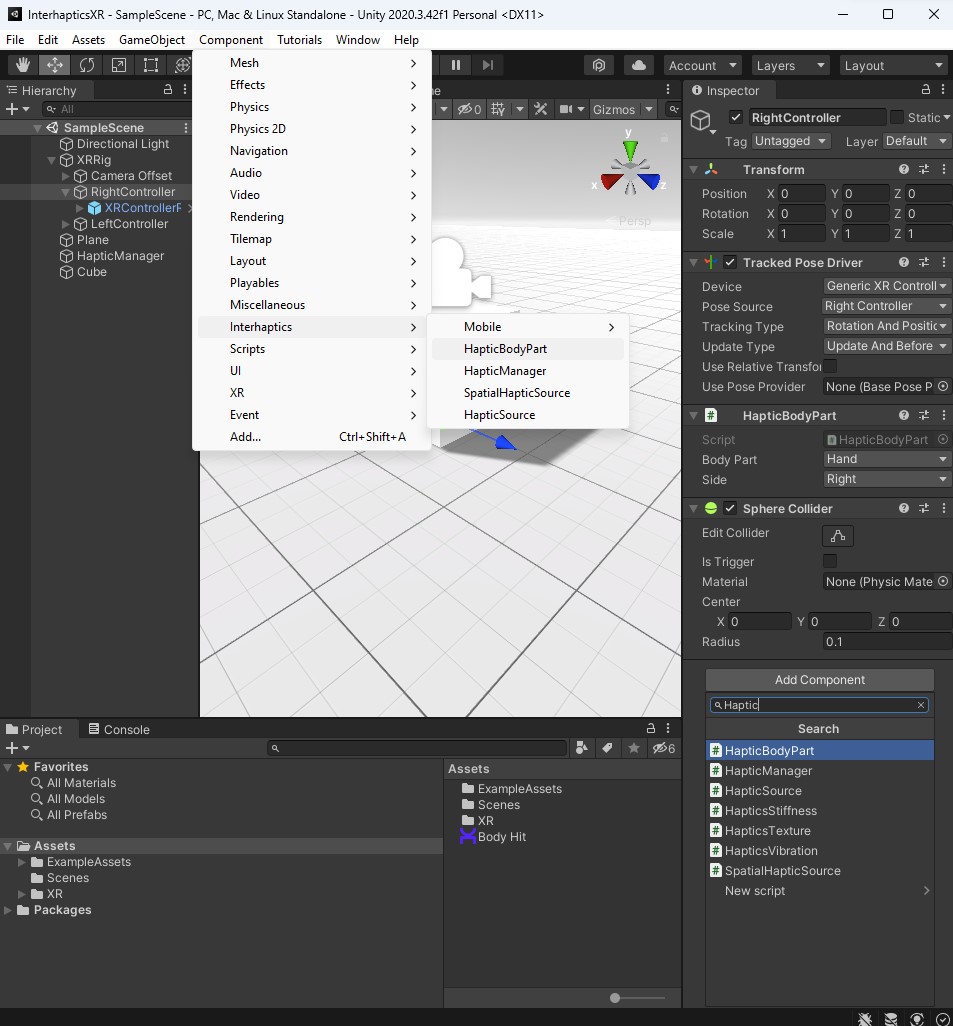
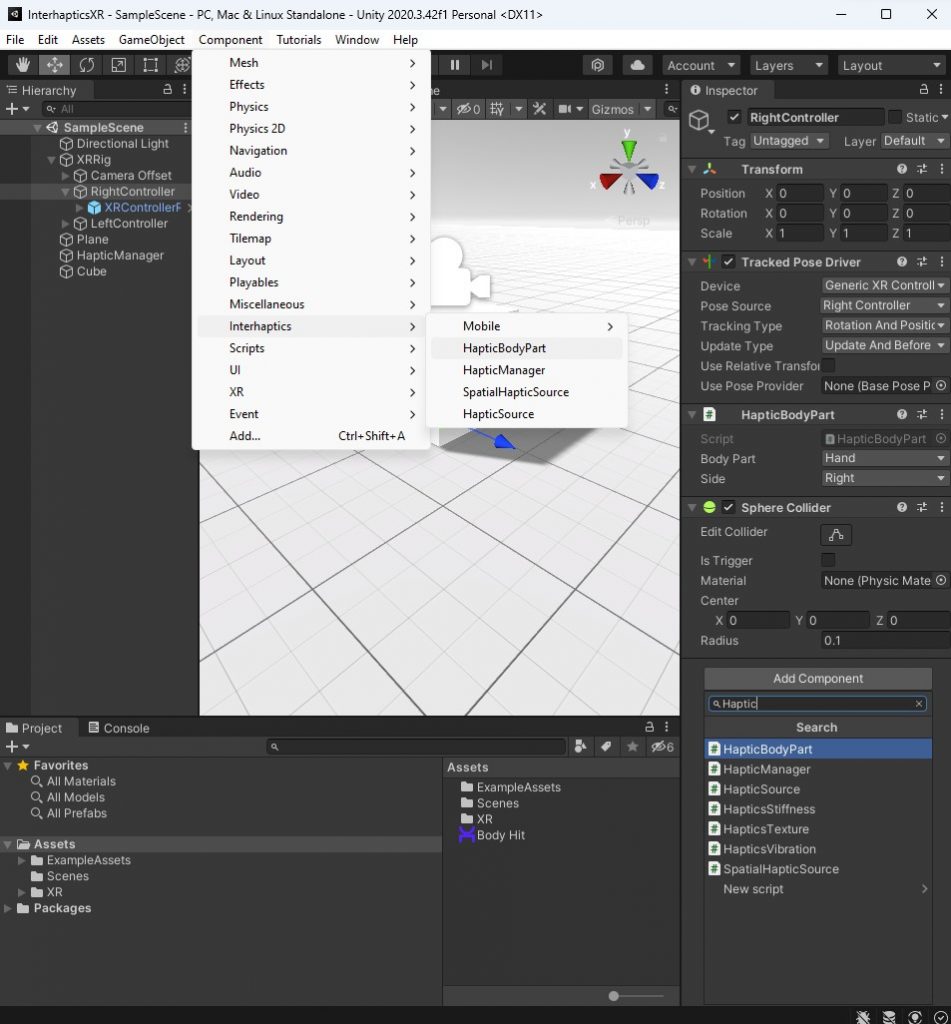
Create a normal GameObject, to act as a source for haptic feedback and add an EventHapticSource component to the GameObject. If you want to use a haptic effect in sync with an AudioSource you can use a variant of this component called AudioHapticSource which also adds the AudioSource. Both haptic source components can be added via the Inspector or through the Component -> Interhaptics option in the Unity top menu. On any HapticSource component, the following options can be set:
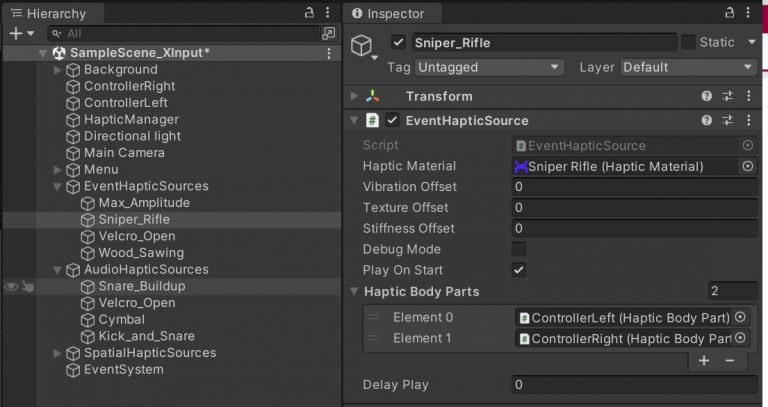
					using Interhaptics.Internal;
using Interhaptics.Utils;
using Interhaptics.Platforms.XInput;

//set the EventHapticSource here
public EventHapticSource eventHapticSource;

void Update()
{
    if (Input.GetKeyDown(KeyCode.Joystick1Button0))
        {
            eventHapticSource.PlayEventVibration();
        }
}
In this section we will show step by step how to add haptic effects to play on a Unity game using an OpenXR compatible headset and controllers. An example scene and scripts are already provided in the Interhaptics Core SDK and can be found in the Interhaptics Core SDK/Assets/Scenes/SampleScene_XR.unity path.
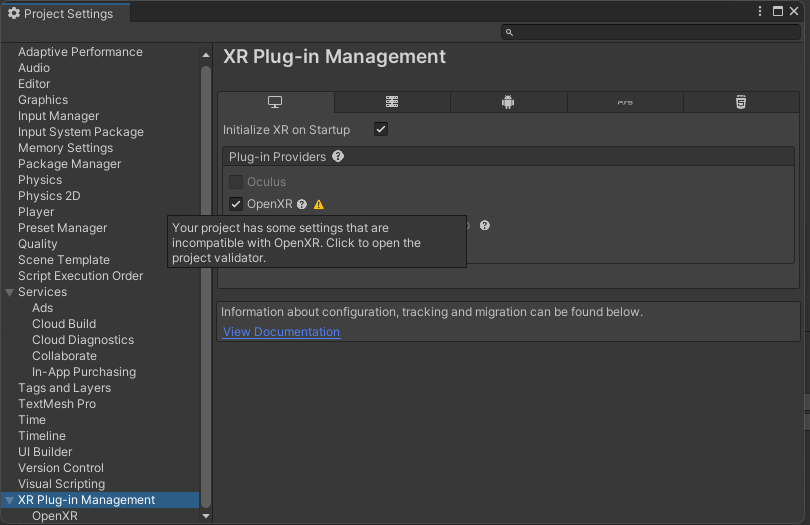
Open Unity Player Settings and navigate to the XR Plugin Management tab. If it is not already installed, set up the XR Plugin Management. Select the “PC” or “Android” platform and observe the available build targets. Click on OpenXR and wait for the appropriate OpenXR plugin to load.
Note: Certain settings unrelated to OpenXR, such as adjusting the color space to Linear and selecting the ARM 64 build architecture, may be required when building for standalone headsets like the Meta Quest or Pico Neo. However, these settings are not covered in this documentation.
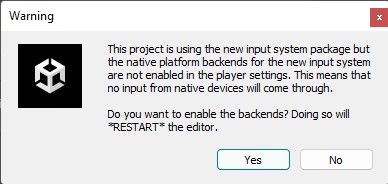
When prompted, install the new input system package by selecting “Yes” and allowing Unity to restart.
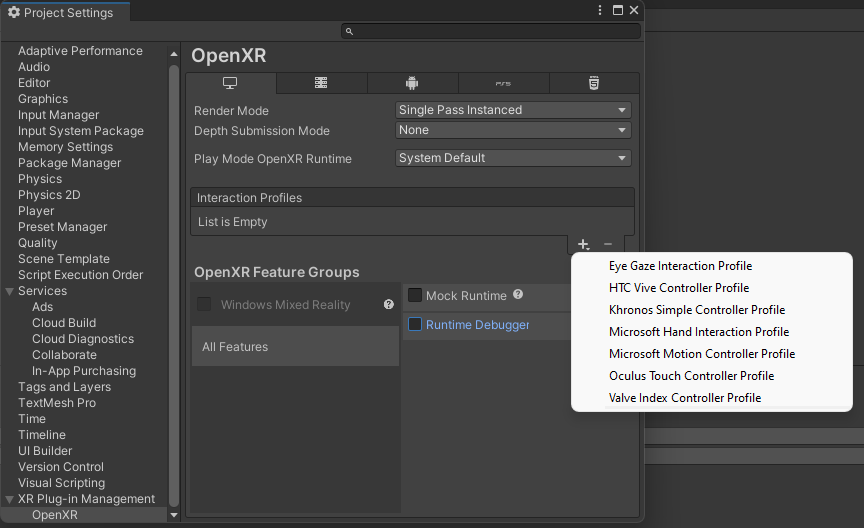
In the OpenXR subtab, locate the “Interaction Profiles” section and add the profiles for the controllers being used.
With the OpenXR environment set up, the application can now be built across various XR platforms, generating the desired inputs and outputs from and on the controllers.
Troubleshooting:
Refer to the provided video tutorial for further guidance.
Requirements:
The Interhaptics SDK add-on for PlayStation 5 can be accessed through the Tools and Middleware repository on the SIE DevNet. However, there are certain conditions, mentioned above, that must be met before obtaining access to the Interhaptics SDK for PlayStation 5.
Request the PlayStation 5 add-on for the Interhaptics Unreal Engine and Unity SDK through the PlayStation 5 DevNet. This will enable you to add haptic effects and build for PlayStation 5.
Once you are granted access to the GitHub private repositories you can go to Step 2 and beyond.
Install the Interhaptics Core SDK in your Unity project by following the standard installation process described in the Getting Started with the Unity SDK chapter.
Take a version of the Interhaptics Unity SDK previous to 1.3.0 (1.2.3 recommended for compatibility). Use https://github.com/Interhaptics/Unity_CoreSDK.git#v1.2.3 in the Unity Package Manger to add it to your project instead of the normal link.
Download, clone or install through the Unity Package Manager the PlayStation 5 Unity SDK add-on from the following link (You must be logged in with the same email which has been granted the GitHub access, otherwise it will give you a 404 error).
Follow the standard documentation provided in the Interhaptics Unity SDK to add haptic effects and build your project for PlayStation 5. Use the videos from the Haptic Composer section as a guide.
To add haptic effects to your Unity project, you can follow the following video tutorial.
For further assistance or support, please refer to the official Interhaptics online documentation and Discord where we will happily provide the answers needed.
The Interhaptics SDK add-on for Nintendo platforms is available through the Nintendo Developer Portal in the section Middleware -> User Interface. Before you can request access to it, ensure you meet the above requirements.
Installation and Integration Steps
Step 1: Requesting the Interhaptics SDK for Nintendo
Step 2: Installing Interhaptics Core SDK
Step 3: Adding the Nintendo Add-on to the Core SDK
https://github.com/Interhaptics/Unity_SwitchSDK
Step 4: Implementing Haptic Effects and Building for Nintendo Platforms
For further help or queries, please consult the official Interhaptics online documentation and join our Discord community for tailored support and answers.
Interhaptics Mobile SDK (legacy) is a deprecated legacy integration tool for haptics on IOS and Android. It has been replaced from version 1.1.0 (03.2023) of the Interhaptics SDK by a new mobile pipeline which is aligned with the Core SDK and the documentation for this can be found in the new Interhaptics Mobile SDK page. It has been completely deprecated starting with version 1.3.0 (11.2023).
Android: To set up correctly the project, verify that Project Settings -> Player -> Other Settings -> Scripting Backend is set to IL2CPP and set the Target Architecture as ARM64 if it is not checked. Uncheck ARMv7 if it is active (strongly recommended). For Android, set the Minimum API Level 23 (Android 6.0 Marshmallow).
It utilizes three main scripts: MobileHapticsStiffness, MobileHapticsTexture, and MobileHapticsVibration, which handle different haptic perceptions.
To set up correctly the project, verify that Project Settings -> Player -> Other Settings -> Scripting Backend is set to IL2CPP.

Before adding these scripts to a GameObject, create an empty GameObject for the HapticManager, which can be set to be persistent if desired.

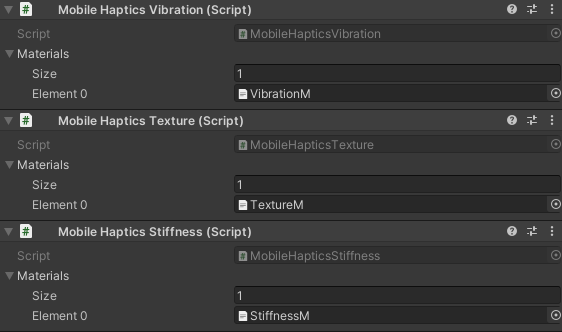
All three scripts are inherited from the abstract class AMobileHapticsReader, and the implementation of each script is the same. To use them, follow these steps:
To use the MobileHapticsVibration script, add it to a GameObject and assign an effect that contains a vibration perception to its array of preloaded effects. The MobileHapticsVibration script contains one public method:
To call the vibration when the button is clicked, call the function PlayVibration(0) if only one effect is set on the MobileHapticsVibration handler
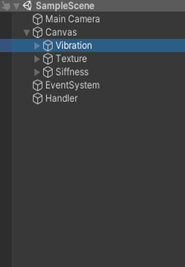
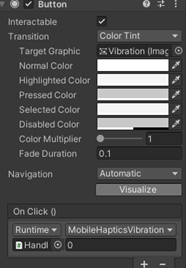
To use the MobileHapticsTexture script, add it to a GameObject and assign an effect that contains a texture perception to its array of preloaded effects. The MobileHapticsTexture script contains two public methods:
To call the texture when the slider value changes, call the function PlayTexture01(0, sliderValue) in the case that the slider value is clamped between 0 and 1, that allows you to play the whole texture from its beginning (0) to its end (1). An example script, TextureSlider, is located in the package and it requires a Slider script. It takes two parameters:

Please note that this feature is only available on IOS devices.
MobileHapticsStiffness contains one public method:
Note that the stiffness perception length is always clamped between 0 and 1. To call the stiffness when the user interacts with the slider, call the function PlayStiffness(0, sliderValue) on the update method, using the slider value clamped between 0 and 1.
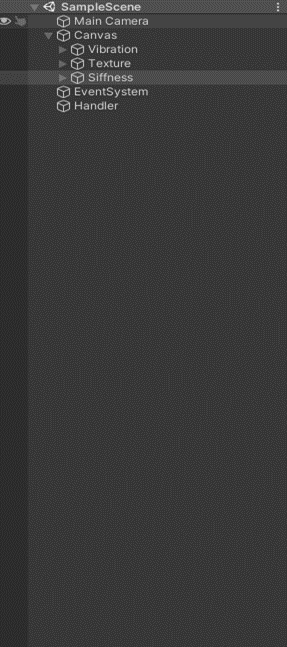
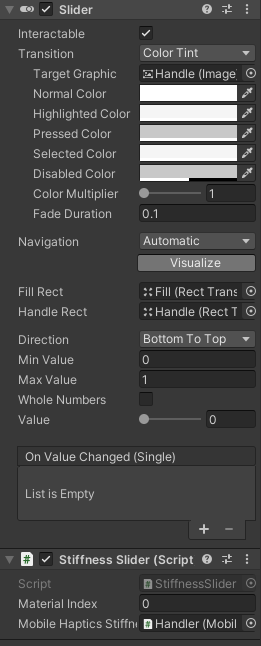
An example script, StiffnessSlider, is located in the package and it requires a Slider script. It takes two parameters:
